I was extremely excited about the ND Fader, a variable neutral density fader that attaches to the front of the lens, because it offered an alternative using the iris or shutter speed to control the light / exposure. As we know shutter speed effects the blur or lack there of. Films have traditionally been shot at twice the frame rate, i.e. 1/48 sec if using 24 fps, giving a smooth look to the motion. This is what we are used to seeing and may seem like a natural look. Some movies and music videos, however, looking for a different look shoot at faster shutter speeds.
To achieve the desired shutter speed while maintaining a certain aperture speed (and iso) we use ND filters. Normally video cameras have these built in and film cameras use a matte box with slots for interchangeable filters. I don't yet have a matte box and am putting off getting one until I have to. So I have gone with the cheaper option - screw on nd filters. You can get various fixed ND filter i.e. 2,4,8 or you can get a variable ND fader that works like a circular polarizer - rotate to increase or decrease effect.
I bought my ND Fader from trademe.co.nz and it isn't the genuine article from france but a cheap Chinese knock-off which is always a risky road to travel but also kinda adds to the excitement. So here I have done some very basic comparisons of video shot at 1/50th, 1/100th, and 1/500 of a second, (using an ND Fader to control the light).
The tests were done on a Canon 5D mk2 with a Canon 24-105mm L lens at f/4 and 25fps.
Note the difference in motion, colour temp, saturation, and flare from sun.
Thursday, 10 November 2011
Monday, 7 November 2011
my complete shoulder rig for under NZD $1.4k
I have finally assembled my complete shoulder rig, which is more difficult than it seems if you are on a tight budget. My rig includes: Proaim Shoulder Rig, Fotga DP500 Follow Focus, Lilliput 5" HDMI Monitor, 2x batteries, 7" articulating arm.
I ordered the Proaim gear from www.cinecity.co.nz (though I later discovered that the .com site is cheaper). The kit actually includes components to be configured as an off-set shoulder mount to be used with an LCD Viewfinder / Loupe but I prefer to operate with a monitor so I have gone a straight configuration. I was pleased to find the rig was easily adaptable and I had a number of options to choose from.
I ordered the Fotga Follow Focus and Lilliput 5" monitor from www.dhgate.com. I found a seller by the name of Kennyzhu particularly helpful with my inquiries. I also ordered two batteries to power the monitor and an articulating arm and clamp to mount it with. The postage was free and there was no tax either. The Proaim gear took about a week and a half the dhgate gear only a week.My initial impressions are good and very satisfied the considerable savings made.

Full assembled shoulder rig with follow focus, 5" monitor and rode video mic.

FOTGA DP500 Follow Focus. Nice all metal feel. Smooth action with very slight play. USD $145.72

One rubber lens belt included. (Additional belts available from USD $13.00)

Proaim sholder rig NZD$789.00 (including postage and tax)

Lilliput 5" HDMI &YPbPr monitor. 800x400 resolution. limited ratio options. Displays full screen but stretched image on record. Full screen correct aspect ratio playback. Goes blank for about 6 seconds before and after rec. USD $224.61

Rechargeable Lithium Battery 6600mAh + Charger. USD $42.75

7" Articulating arm plus clamp. USD $49.95


Counter weight


Riser, Tripod base plate, Camera base plate,


Extra parts that I am not using in this particular configuration.


Alternatively you could buy this Redrock Micro Kit from B&H for NZD $4531.00 (not including postage & packaging)
John Galt - the truth about 2k, 4k and the future of pixels
http://magazine.creativecow.net/article/the-truth-about-2k-4k-the-future-of-pixels
Friday, 28 October 2011
Zeiss ZF.2 Prime Lenses
My friend recently purchased three Zeiss ZF.2 lenses - 50mm f/1.4, 85mm f/1.4, 100mm f/2. He picked them up on eBay from a store in Hong Kong. He said they were a little bit cheaper than B&H.
They are indeed well designed lenses. Solid construction, flawless mechanics and great aesthetics. the picture quality is second to none. 9 aperture blades provide very smooth bokeh. accurate colours and rich tones. Film makers like to go with the ZF.2 nikon mounted variety because of the manual aperture ring. The only issue when using cheap lens mount adapters to fit Canon bodies is the play cause by the adapter. This becomes even more frustrating when using lenses with the kind of precision of zeiss primes.

Something to note about the 100mm which lived up to its high billing as a terrific image-producing lens is that when it focuses the entire front section (about half the length of the lens) rotates and moves forward. This forward movement causes two issues 1) when using a matte box the front of the lens will rn into the filters 2) the lens belt will move away from the lens gear. also, when focusing, the lens rotate more than 360 degrees causing an issue with lens belts that clamp on via screws as they will collide with the lens gears.
Camelion Batteries for Canon 5d mk2
I picked these after market batteries made by Camelion from E-Infotech for $40 each. They power the camera but do not accurately display their level of charge. A2Z stock a battery made by Swit for $70 that do, so I would suggest going with those. The Canon LP-E6 goes for $115 at the same store.


kingston Ultimate 16GB 266x CF cards
I picked up a couple of these cards from E-Infotech in Glenfield. They are selling them for NZD$100 each. I had seen them on B&H for about USD$34 or NZD$42. I asked The guys at E-Infotech about the huge price difference and they explained that bought them in NZ and they paid a high price for them too. They offered me a discount on my next purchase. E-Infotech has been usually around the cheapest in the NZ market but it shows that it always pays to shop around.

The cards work fine with my 5d mk2 and are still loads cheaper than the Scandisk CF cards. Stay away from the 133x as they will not allow you to record the maximum duration clips.

The cards work fine with my 5d mk2 and are still loads cheaper than the Scandisk CF cards. Stay away from the 133x as they will not allow you to record the maximum duration clips.
Proaim DSLR full kit (from India)
Proaim from what I can tell is a company based in India. Their DSLR accessories range closely mimic the much coveted but over-priced Zacuto products. My friend has just received his DSLR kit including shoulder mount / camera and tripod base plate / follow focus / lcd viewfinder loupe / matte box / 7 inch monitor. He paid something like USD $1400 from www.thecinecity.com which is cheaper than the www.cincity.co.nz website. Unfortunately I had already placed my order for a shoulder mount rig unknowingly from the latter website which I will review shortly.
In general the gear is pretty solid. The engineering may not be as precise as the genuine article but fully functional never the less.

This is an off-set shoulder mount with counter-weight. It feels reasonably comfortable with the ff mounted on the right as most of the weight fall on the left hand grip. The tripod base plate / rails are not adjustable since the rails do not go through but is comprised of four pieces that screw into either end of the base plate. With the rails included we could not fit a zeiss zf 100mm without hitting the matte box.

The view finder looks very similar to the zacuto z-finder and is very well made (possibly the best value item in the kit).

The quick release system has been well designed though there is a bit of play between the connecting parts after tightening. The follow focus is solid but lacks a quick release system taking longer to adjust. There is no play in the gears. 5 lens gears were included three of which were two big to fit on any of the zeiss zf lenses.

The matte box is attached from the bottom (not swing-away) and feels a bit flimsy. the filter trays are made of plastic.

The 7 inch monitor has 800 x 480 resolution. there are minimal display options comparable to monitors made by Liliput. it uses a standard sony battery mount with small sony battery included. HDMI input, in-built speaker and so on.
note. The packaging is rough and the rig comes with an alarming amount of dust and grime on it. after putting together my hands were thoroughly dirty. It's kinda gross but it I like the romantic picture it triggers in my mind of the industrious if slightly chaotic Indian factory where it was produced. I'm not a label basher and welcome alternative products at competitive prices. Go the Indians!
Wednesday, 6 April 2011
links to helpful tutorials
Here I will post a selection of tutorials I have found helpful. Enjoy!
# Why record in LOG: http://www.youtube.com/watch?v=fUF8xkjOnAI
# Colour correction in After Effects / Photoshop: http://vimeo.com/14396098
# Time Lapse Flicker issue: http://www.granitebaysoftware.com/Support/Tips/TipFlicker.aspx
# Why record in LOG: http://www.youtube.com/watch?v=fUF8xkjOnAI
# Colour correction in After Effects / Photoshop: http://vimeo.com/14396098
# Time Lapse Flicker issue: http://www.granitebaysoftware.com/Support/Tips/TipFlicker.aspx
Monday, 4 April 2011
HDR Timelapse
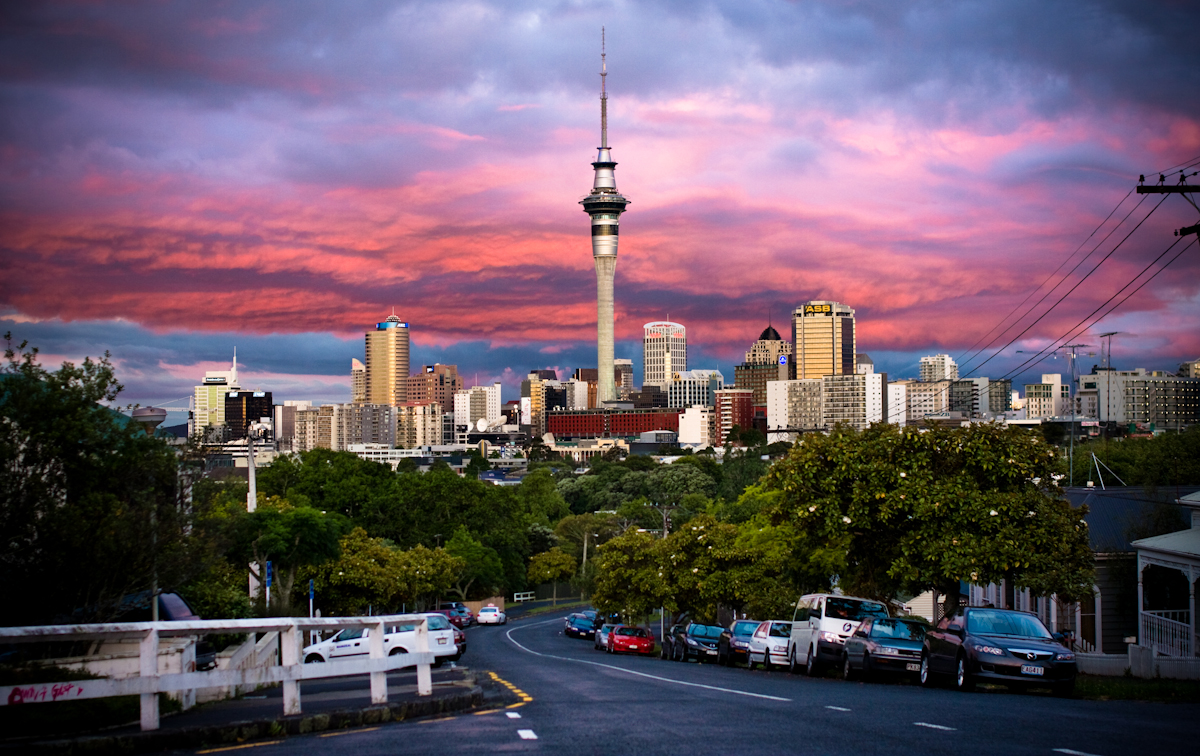
I had a go at an HDR Timelapse today. HDR or High Dynamic Range is when you take multiple shots at variable exposures and combine them later using photoshop or similar. Here's one I took some time ago near Ponsonby road, Auckland.
 In this shot I combined two exposures and pasted them together manually in photoshop. This is the most basic of HDR and there are a number of programs that do it automatically. I was a bit reluctant to try an HDR Timelapse because I hadn't figured out a efficient workflow and the thought of so many files was a bit intimidating. So I googled it and I came across this tutorial. Apparently it's pretty easy...
I added a step of importing my photos into Adobe Lightroom (which is part or my normal workflow) and exporting them with a 16:9 crop factor at 1080 X 1920. I'm assuming reducing the images will have cut down the processing time in Photomax. In Photomax I used the Enhancer - Painterly preset. Finally in QuickTime 7 I added a little contrast on export.
Photomax Lite costs US$39, Photomax Pro US$99. Download a trial version of Photomax Pro 4.0.2 for mac here.
Update: have updated the clip. here are some other images I have been foolin around with.

Sunday, 3 April 2011
Magic Lantern AJ5.0 for 5D mk2
This morning I have been testing the Magic Lantern AJ5.0 firmware on my 5D.
Magic lantern is a free 3rd party firmware developed to give 5D users greater functionality. Originally designed by Trammell Hudson, this latest version has been developed by an A J Newman. This video outlines the firmwares features.
The most valuable features from my point of view are the audio monitoring. This does work but because it is an a/v output when I plug in my headphones only one channel comes through at once. If I want to hear the other channel I have to pull the plug out slightly but then the other side disappears. I did find this product has just been released to combat this exact issue. Also the signal is very faint and doesn't give you the audio quality you need to make critical decisions. It is also nice to be able to see an estimation of how much recording time is remaining.
To install, download the firmware and copy the downloaded files to your CF card. On your 5D got to Menu > Select the Firmware Version 2.0.4 > Select Magic Lantern 1.7 > Go into Live View and the Magic Lantern firmware will automatically boot up. Hit the Picture style button to get into the Magic Lantern Menu. Use the Multi-Controller to navigate the menu and push the Multi-Controller to select a positive or negative value then use the Shutter button to change the value.
Note: Magic Lantern will not work on Canon Firmware 2.0.8 you will need to go back to version 2.0.4.
On one hand the firmware is absolutely awesome with a lot of valuable features that really enhance the camera as a professional tool. Massive respect to the guys who put in a lot of work to create it. On the other hand there are still way too many bugs that cause the camera to lock up which requires the battery to be removed in order to reset it. I had to do this about ten times in space of about an hour. Removing the battery however means the Magic Lantern Firmware must be re-installed. Actually it needs to be re-installed ever time the camera is powered down. The re-install only takes about 30 seconds and your setting can be easily saved.
So it is really up to the user if they are willing to put up with the frustration of an unstable firmware for the addition of some pretty cool features. On a professional shoot when time is precious and I am already dealing with a number of work-arounds to make this camera work I doubt I have the patience to be fiddling around with things like this that really shouldn't be an issue.
Having said that I am very excited about the direction such inventions are taking us. Canon have a powerful product in the 5D but have not allowed us its full potential. These innovators are pushing the technology and the spirit of co-operation by releasing it for free. Great stuff.
Thursday, 31 March 2011
Aspect Ratio / Video Standards Chart
Here you go all you chart lovers. feast your eyes on this!

Aue! Me tini oku tarau...

Aue! Me tini oku tarau...
Time-lapse / Under-crank
In film & video speak cameras have the ability to over crank (slow motion) and under crank (fast motion). Top of the line film cameras have had this facility for a while while the technology is relatively new to video cameras. The Sony EX1, for example can record anything between 1 and 60 frames per second. The footage is always played back at 25 fps or 30fps depending on which standard your country conforms to (PAL or NTSC). Thus when something is recorded at 1 fps and then played back at 25 fps it will appear sped up. Footage recorded at 60 fps will have the opposite effect and appear much slower than real time.
The 5D can't over crank at his stage although users are optimistic about a firmware upgrade that will allow it in the future. The 7D can record up to 60 fps in 720p. Under cranking however is easy with the addition of an inexpensive shutter remote / timer like this.
 I bought mine on trademe for NZ $65. It allows me to take a single exposure every 1 second - 100 hours. You can make it do this infinitely until the battery runs out which is approximately 2 months of constant use.
You can also use it as a Timer Delay which allows you to set the time between when you trigger the remote and when the the camera shoots - up to 10 hours.
You can also set the duration of the exposure when the camera is set to Bulb - up to 10 hours.
Here is an example of a time lapse I shot this morning at the Ports of Auuckland.
How I did it:
Obviously you will need to use a tripod if you want your movie to look steady. Set up your shot as you normally would keeping in mind that we as viewers are used to seeing a bit of motion blur which means keeping the shutter speed down in the 50-100th of a second range. On a bright sunny day this means closing down the iris.. a lot. But if this is giving an undesirable effect to your image then you may like to employ a ND filter to cut down the light coming in to your camera.
Set you remote timer appropriately. The above time lapse was set at one exposure per second. If the action is very slow such as the stars or a flower blooming you will want to make the interval a bit longer.
I usually set my picture quality to large jpeg and then snap away. I usually turn off the Live View mode saving the camera power and effort but in the instance above I left it on so I could review the shots as they came in, though this can also be done through the view finder.
 Once completed I ingest my photos via Adobe Lightroom > Make any adjustments to one the images in the Develop section > Apply a 16:9 crop factor to that same image > Control click (right click PC) the image and under Develop Setting select Copy Settings > Select all the images of the time lapse > Control click and paste settings > With all images still selected Control click and select Export > Make a new folder and resize the image with a longest edge of 1920 pixels (1080 HD) > exit Lightroom and open QuickTime Player 7
Note: QuickTime Player 7 is included with Final Cut Studio HD.
In QT7 click File and select Import Image Sequence > navigate to the folder containing the images exported from Lightroom and select the first image file hit open. You should see your time lapse. Then export it is any format you choose.
Note: This is the way that I have done it and may be one of many ways to create time lapses.
The 5D can't over crank at his stage although users are optimistic about a firmware upgrade that will allow it in the future. The 7D can record up to 60 fps in 720p. Under cranking however is easy with the addition of an inexpensive shutter remote / timer like this.

You can also use it as a Timer Delay which allows you to set the time between when you trigger the remote and when the the camera shoots - up to 10 hours.
You can also set the duration of the exposure when the camera is set to Bulb - up to 10 hours.
Here is an example of a time lapse I shot this morning at the Ports of Auuckland.
How I did it:
Obviously you will need to use a tripod if you want your movie to look steady. Set up your shot as you normally would keeping in mind that we as viewers are used to seeing a bit of motion blur which means keeping the shutter speed down in the 50-100th of a second range. On a bright sunny day this means closing down the iris.. a lot. But if this is giving an undesirable effect to your image then you may like to employ a ND filter to cut down the light coming in to your camera.
Set you remote timer appropriately. The above time lapse was set at one exposure per second. If the action is very slow such as the stars or a flower blooming you will want to make the interval a bit longer.
I usually set my picture quality to large jpeg and then snap away. I usually turn off the Live View mode saving the camera power and effort but in the instance above I left it on so I could review the shots as they came in, though this can also be done through the view finder.
 Once completed I ingest my photos via Adobe Lightroom > Make any adjustments to one the images in the Develop section > Apply a 16:9 crop factor to that same image > Control click (right click PC) the image and under Develop Setting select Copy Settings > Select all the images of the time lapse > Control click and paste settings > With all images still selected Control click and select Export > Make a new folder and resize the image with a longest edge of 1920 pixels (1080 HD) > exit Lightroom and open QuickTime Player 7
Note: QuickTime Player 7 is included with Final Cut Studio HD.
In QT7 click File and select Import Image Sequence > navigate to the folder containing the images exported from Lightroom and select the first image file hit open. You should see your time lapse. Then export it is any format you choose.
Note: This is the way that I have done it and may be one of many ways to create time lapses.
Wednesday, 30 March 2011
Blackbird Camera Stabilizer
 The Blackbird is a lightweight hand-held steadicam.
I bought my Blackbird Camera Stabilizer Kit off B&H's online store for US$669.95 not including P&P.
I had to import myself as there are no distributors yet in New Zealand. The cost of postage were rather hefty and I had to pay G.S.T. as it came through customs. The package arrived at my doorstep in less than two weeks.
after roughly assembling the small rig I immediately mounted my 5d. It was easy to work out and didn't take long to get it roughly balanced.
As with all camera stabilizers a lot depends on the skill of the user. it took me roughly a week to really get the hang of it.
Whereas previous semi-pro cameras were too heavy on top of hand-held stabilizers the 5d and other DSLRs are perfect for these light weight rigs. Wide angle lenses such as a 24mm on a full frame camera work best with steadicams. Here is a look at my test footage.
The Blackbird is made by CMR - a relatively small American company. The Steadicam Merlin is a more popular unit. It is more compact than the Blackbird. It is also slightly more expensive. The extra length of the Blackbird also restricts how very low to the ground action.
I decided to chance my arm at the blackbird, besides I had gotten the impression from reviews that the Merlin was more difficult to find the equilibrium. So far I have been very happy with the Blackbird. It is a well designed, solid piece of equipment. It is quick and affordable solution to giving movement to your shots.
stranger cole plays galatos
I helped my friend Razzie who drums for the Moisties film a gig they did with Stranger Cole - a legend in Jamaican Ska music. Here is an insert from his interview.
The above was shot on my 5d with a canon 50mm 1.4 and a Shure videomic under house lights. Below I switched to a canon 135mm 2.0 L lens.
The above was shot on my 5d with a canon 50mm 1.4 and a Shure videomic under house lights. Below I switched to a canon 135mm 2.0 L lens.
Saturday, 26 March 2011
New Red Epic
Red's new Epic is out said to cost around US $58 K. Peter Jackson pre-ordered a bunch of them to shoot the up-coming Hobbit.
Potential users are getting excited about the Epic's HDR for video technology. HDR is a technique that is used widely in digital photography where two or more photos with different exposures are fused into one thus expanding the image's dynamic range. Follow this link to a good blog post by Prolost which puts the new camera/technology into context.

Potential users are getting excited about the Epic's HDR for video technology. HDR is a technique that is used widely in digital photography where two or more photos with different exposures are fused into one thus expanding the image's dynamic range. Follow this link to a good blog post by Prolost which puts the new camera/technology into context.
Friday, 25 March 2011
Sony release NEX FS100
Having just tested Sony's F3 I was interested to learn today that Sony have introduced a new camera targeting the prosumer market.

The NEX FS100 has the same Super 35 sensor as the F3 and is said to costs around US 6K.
Den Lennie from f-stop academy has made this review
this is great news if you are a sony DSLR owner with sony lenses. The rest of us are still waiting for Canon or Nikon to come out with a full frame equivalent.
One significant point of difference is this cameras ability to capture 1080p at 60fps, something very rare at this stage.
So far comments have criticized the AVCHD capture format and the lack of built in ND filters.
Tuesday, 22 March 2011
Hands on - the new Sony F3
I am in Rotovegas at the moment helping my friend Mahanga shoot a 30min doco for Te Waka Huia.
We are shooting on sony's latest PMW F3 with an Angenieux 16-44mm zoom and a Zeiss 60mm prime and recording to a NanoFlash external recorder. Paul from Nutshell also threw in an Oconner matt box and follow focus.

This is the first time we have used an F3 but the menus are external button are very similar to the EX cameras with which we are familiar. There has been some hype about the F3 due to its Super 35mm sensor, its PL lens mount and its comparatively low price. The Super 35mm sensor is significantly larger than those of the EX series cameras but smaller than those of full frame cameras such as the 5D. This means a crop factor to 35mm lenses so the effective focal length of our 60mm is 83.something mm.
The NanoFlash is a cool little device that allows us to up the bit-rate of our 1080 HD video from 35 to 100 Megabits per second (or higher) allowing 4:2:2 sub-sampling. learn more about the NanoFlash.
The Angenieux and Zeiss lenses are both superb in picture quality and design and the follow focus really does make a difference. Check out these pix.


The doco will consist mainly of interviews and controlled cut aways. We are using my 5d and prime lens kit as a B kit. Also squeezed into our rental car is a Kino Flow Diva, 2 Blondes, 2 Arri 650's, 5 stands plus 2 C stands, a light dolly system, a couple of macbook pro's and some sound gear.
Setting up and Packing down we felt we were short a couple of crew members but all was forgiven when I discovered my motel room had a spa bath. =)
We are shooting on sony's latest PMW F3 with an Angenieux 16-44mm zoom and a Zeiss 60mm prime and recording to a NanoFlash external recorder. Paul from Nutshell also threw in an Oconner matt box and follow focus.

The NanoFlash is a cool little device that allows us to up the bit-rate of our 1080 HD video from 35 to 100 Megabits per second (or higher) allowing 4:2:2 sub-sampling. learn more about the NanoFlash.
The Angenieux and Zeiss lenses are both superb in picture quality and design and the follow focus really does make a difference. Check out these pix.


The doco will consist mainly of interviews and controlled cut aways. We are using my 5d and prime lens kit as a B kit. Also squeezed into our rental car is a Kino Flow Diva, 2 Blondes, 2 Arri 650's, 5 stands plus 2 C stands, a light dolly system, a couple of macbook pro's and some sound gear.
Setting up and Packing down we felt we were short a couple of crew members but all was forgiven when I discovered my motel room had a spa bath. =)
Friday, 18 March 2011
5D video work flow
I recently shot a friend's wedding on my 5D. It has been a valuable exercise in terms of establishing a good workflow when using this camera.
It was a Chinese wedding meaning it was long and it was frantic! In the end 2.5 hours of rushes in HD1080p totaling almost 52GB of data.
The 5D records quicktime movies using H.264/MPEG-4 compression at 38 Megabits per second. You can work with these file directly in Final Cut Pro but playback is jerky and soon becomes infuriating. By the way I am using a Macbook Pro 2.4 GHz Core 2 Duo with 4GB Ram.
The most common solution is to convert the files into Apple ProRes 422 using compressor which comes with Final Cut Studio. Thus maintaining HD resolution and working well in FCP. The only drawback is the ProRes files are about 3 times larger than the H.264 files. So you will need a decent amount of space to store them.
Once edited I now wanted to create a DVD for my friends. Having shot in HD naturally I wanted to give my friends the best quality video possible. At the moment you have the option of burning HD video to a Blue-ray disc or down-converting to SD video and burning a standard 4.7 DVD.
Since I don't own a Blue-ray burner nor do I think my friends own a Blue-ray player I have decided to down-convert to an SD DVD. I will also give them a copy of the HD video file to view on their PC.
I also came across this interesting post by Ken Stone about a possible alternative.
In Compressor i used the first DVD settings preset dragging the whole folder up and applying to my clip.
I created a simple DVD menu in DVD Studio Pro and changed the settings to SD 16:9. This needs to be done in the preferences and on each menu under display mode.
Again refer to Ken Stone's Setting up DVD Studio for 16:9.
Now I am in the final stages of creating my DVD. I will post an update once I have finished.
Tuesday, 15 March 2011
wedding video
I helped a friend film their wedding last weekend. The shoot re-educated me about two things - 1) the importance of having a good solid tripod and 2) the limitations of using slr zoom lenses for video.
Weddings can be tricky events to cover. They are similar to news and documentary filming in that you only get one crack at it... so you better be well prepared. During a wedding ceremony you need to balance coverage and discreetness. For this I decided to hire a fairly long zoom lens - Canon 70-200mm f2.8 L.

The lens performed beautifully. The images were superb and it was a joy to use. I hired mine from Topic Rentals for nz$64 + GST per day. They retail at around nz$1855 +GST.
In addition I also purchased a 77mm ND Fader off Trademe for nz$105. I now own three of these faders (52mm, 67mm) and really like using them when shooting video. Find out more about ND Faders.
Getting back to my first two points... unfortunately I wasn't able to find my video tripod for the wedding and had to resort to using my much less sturdy stills tripod. This was very limiting especially when using the longer focal lengths of the 70-200mm. I was having to lock of the ball joint head and remove my hands completely to get a decent steady shot not to mention trying any panning or tilting. I was also completely paranoid about the safety of my camera and hired lens on such a flimsy set of sticks. A good tripod should be strong and have enough weight to stabilize the rig. A good fluid head is also a must. This will make a huge difference to the end product.
Secondly I have realised that you should not expect to manually zoom in any usable fashion. SLR zoom lenses are much stiffer than video zooms resulting in jerky push-ins and pull-outs. Never again will I take for granted the smoothness and ease of using a servo nor the focal range they afford.
On review of my rushes I found I was guilty of changing my frame at crucial moments in effect losing those moments because it was unusable footage. I also attempted to reposition myself to improve my view of a certain moment and ending up missing the moment altogether.
In my footage I see the photographer running in and out of frame, darting here and there. Although I am using a dslr I must remind myself that in this case I am not a photographer but a videographer. Whereas the photographer tries to capture the moment, a videographer tries to capture an event including all the 'I do's' and the 'You may kiss the bride's'.
So lesson of the day?... Get the right gear. If you don't have the right gear then be prepared to operate within it's limitations. Have patience and utilize the camera's strengths by doing the basics well.

On a positive note the Canon 70-200mm f2.8 L is a beautiful lens that when used appropriately can be a powerful tool for photographers and videographers alike.
Monday, 7 March 2011
Eg-S Focus Screen
I was in Melbourne last weekend photographing my cousins wedding. I was keen on buying an new focus screen for my 5D mk2. I decided to go with the Eg-S Super Precision Matte Focus Screen.
 It cost me AU$35 from a local camera shop. It was easy enough to install and wow what a difference it makes when using apertures faster than 2.8. Now I can use my Nikon manual focus lenses, which I prefer to use for video, with confidence as I can actually see what my lens is doing through the view finder. At apertures faster than 2.8 when the depth of field becomes very shallow the Eg-S focus screen allows more information than the standard Eg-A focus screens. As reported the screen does get darker when stopped down to 5.6 and above. This is something I can live with as I normally check exposure in the lcd screen anyway.
This is a good investment for anyone who uses fast lenses and prefers to manually focus their shots. Plus reasonably priced.
This is a good investment for anyone who uses fast lenses and prefers to manually focus their shots. Plus reasonably priced.
Thursday, 3 March 2011
my gear
Canon 5D mk2
Canon 35mm 2.0
Canon 50mm 1.4
Canon 135mm 2.0 L
Nikon 24mm 2.0 MF
Nikon 50mm 1.4 MF
Nikon 85mm 1.8 MF
Tamron 28-75mm 2.8
Tamron 90mm 2.8 macro
52mm ND Fader
67mm ND Fader
Ikan Starterfly Kit
Proaim Shoulder Mount
Digi Finder LCD viewer
Rode Video Mic
Sennheiser ew 100 radio mic
Canon Speedlite 580 EX
Sound Devices MM1 microphone pre-amp
Miller Solo Eng 3 stage Tripod
Blackbird Camera Stabilizer
LiteDisc reflector
Macbook Pro 2.4 GHZ Core 2 Duo
FinalCutPro Studio HD
CS5 Production Premiere Bundle
Wednesday, 2 March 2011
Me and my 5D
The Canon 5D mk2 was my second dslr camera. My first was the Canon 40D. I think what was most appealing about the 5D was the full frame sensor. I'd never used a full-frame camera before but liked the idea of realising the full potential of my one and only prime lens - canon 50mm f1.4. That the 5D also shoots HD video was further justification for my pricey acquisition. Well not that pricey considering my previous camera, the Panasonic DVX100, cost over $5000 nzd. But to be honest... video production was only a secondary motive.

I was hardly aware that there was so much enthusiasm for these HD capable DSLRs from video producers around the world. Of particular interest were the 7D and 5D followed shortly by the 550D, all by Canon. Nikon also had HD ready DSLR's that fell out of favor with its users for some reason I don't remember and didn't really care. The Irony now is that many Canon HD DSLR users attach older Nikon manual focus lenses to their canon bodies because 1) they are better than the Canon manual focus lenses and 2) they are easily made compatible via a cheap lens mount adapter whereas Canon FD lenses are a night-mere to use with Canon EOS cameras and don't really work.
After playing around with the 5D a bit it wasn't difficult to see what all the hype was about. The picture quality is jaw-dropping at first. Much of its mystique is about... How can such a small little camera produce such stunning pictures? Then, after the initial amazement one comes back to reality about its many limitations and the focus quickly turns to how its power can be harnessed.
I came from a television / documentary making background so my demands differed from those of movie makers. Most concerning to run and gun style operators was the lack of audio recording facilities. Despite a number of peripheral companies developing work-around products weak audio capabilities continue to limit the practicality of the 5D. It is also very small which is great for holding up to your eye but not so with out-stretched arms. Thus followed a wave shoulder rigs, lcd viewers, follow focuses and the like... some of which costing more than the camera itself. After hours of online window shopping / fantasizing about elaborate rigs and pimped out monstrosities I finally came to a more minimal solution.
Although there is much ground to cover I am now at a stage where I feel confident in using my 5D in a professional environment. Part of the appeal of these cameras is the excitement of the unknown taking it's users on a journey of discovery. Kinda like Captain Kirk on Startrek but not as cool and more geeky.
Subscribe to:
Posts (Atom)