Thursday 31 March 2011

Aspect Ratio / Video Standards Chart

Here you go all you chart lovers. feast your eyes on this!


Aue! Me tini oku tarau...

Time-lapse / Under-crank

In film & video speak cameras have the ability to over crank (slow motion) and under crank (fast motion). Top of the line film cameras have had this facility for a while while the technology is relatively new to video cameras. The Sony EX1, for example can record anything between 1 and 60 frames per second. The footage is always played back at 25 fps or 30fps depending on which standard your country conforms to (PAL or NTSC). Thus when something is recorded at 1 fps and then played back at 25 fps it will appear sped up. Footage recorded at 60 fps will have the opposite effect and appear much slower than real time.

The 5D can't over crank at his stage although users are optimistic about a firmware upgrade that will allow it in the future. The 7D can record up to 60 fps in 720p. Under cranking however is easy with the addition of an inexpensive shutter remote / timer like this.

I bought mine on trademe for NZ $65. It allows me to take a single exposure every 1 second - 100 hours. You can make it do this infinitely until the battery runs out which is approximately 2 months of constant use.

You can also use it as a Timer Delay which allows you to set the time between when you trigger the remote and when the the camera shoots - up to 10 hours.

You can also set the duration of the exposure when the camera is set to Bulb - up to 10 hours.

Here is an example of a time lapse I shot this morning at the Ports of Auuckland.


How I did it:

Obviously you will need to use a tripod if you want your movie to look steady. Set up your shot as you normally would keeping in mind that we as viewers are used to seeing a bit of motion blur which means keeping the shutter speed down in the 50-100th of a second range. On a bright sunny day this means closing down the iris.. a lot. But if this is giving an undesirable effect to your image then you may like to employ a ND filter to cut down the light coming in to your camera.

Set you remote timer appropriately. The above time lapse was set at one exposure per second. If the action is very slow such as the stars or a flower blooming you will want to make the interval a bit longer.

I usually set my picture quality to large jpeg and then snap away. I usually turn off the Live View mode saving the camera power and effort but in the instance above I left it on so I could review the shots as they came in, though this can also be done through the view finder.

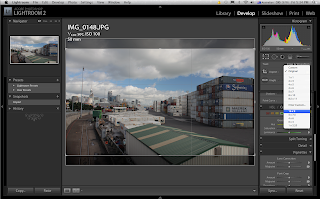
Once completed I ingest my photos via Adobe Lightroom  >  Make any adjustments to one the images in the Develop section  >  Apply a 16:9 crop factor to that same image  >  Control click (right click PC) the image and under Develop Setting select Copy Settings  >  Select all the images of the time lapse  >  Control click and paste settings  >  With all images still selected Control click and select Export  >  Make a new folder and resize the image with a longest edge of 1920 pixels (1080 HD)  > exit Lightroom and open QuickTime Player 7

Note: QuickTime Player 7 is included with Final Cut Studio HD.

In QT7 click File and select Import Image Sequence  >  navigate to the folder containing the images exported from Lightroom and select the first image file hit open. You should see your time lapse. Then export it is any format you choose.

Note: This is the way that I have done it and may be one of many ways to create time lapses.

Wednesday 30 March 2011

Blackbird Camera Stabilizer

The Blackbird is a lightweight hand-held steadicam.

I bought my Blackbird Camera Stabilizer Kit off B&H's online store for US$669.95 not including P&P.

I had to import myself as there are no distributors yet in New Zealand. The cost of postage were rather hefty and I had to pay G.S.T. as it came through customs. The package arrived at my doorstep in less than two weeks.

after roughly assembling the small rig I immediately mounted my 5d. It was easy to work out and didn't take long to get it roughly balanced.

As with all camera stabilizers a lot depends on the skill of the user. it took me roughly a week to really get the hang of it.

Whereas previous semi-pro cameras were too heavy on top of hand-held stabilizers the 5d and other DSLRs are perfect for these light weight rigs. Wide angle lenses such as a 24mm on a full frame camera work best with steadicams. Here is a look at my test footage.


The Blackbird is made by CMR - a relatively small American company. The Steadicam Merlin is a more popular unit. It is more compact than the Blackbird. It is also slightly more expensive. The extra length of the Blackbird also restricts how very low to the ground action.

I decided to chance my arm at the blackbird, besides I had gotten the impression from reviews that the Merlin was more difficult to find the equilibrium. So far I have been very happy with the Blackbird. It is a well designed, solid piece of equipment. It is quick and affordable solution to giving movement to your shots.

stranger cole plays galatos

I helped my friend Razzie who drums for the Moisties film a gig they did with Stranger Cole - a legend in Jamaican Ska music. Here is an insert from his interview.


The above was shot on my 5d with a canon 50mm 1.4 and a Shure videomic under house lights. Below I switched to a canon 135mm 2.0 L lens.


Saturday 26 March 2011

New Red Epic

Red's new Epic is out said to cost around US $58 K. Peter Jackson pre-ordered a bunch of them to shoot the up-coming Hobbit.


Potential users are getting excited about the Epic's HDR for video technology. HDR is a technique that is used widely in digital photography where two or more photos with different exposures are fused into one thus expanding the image's dynamic range. Follow this link to a good blog post by Prolost which puts the new camera/technology into context.

Friday 25 March 2011

Sony release NEX FS100

Having just tested Sony's F3 I was interested to learn today that Sony have introduced a new camera targeting the prosumer market.


The NEX FS100 has the same Super 35 sensor as the F3 and is said to costs around US 6K.

Den Lennie from f-stop academy has made this review

this is great news if you are a sony DSLR owner with sony lenses. The rest of us are still waiting for Canon or Nikon to come out with a full frame equivalent.

One significant point of difference is this cameras ability to capture 1080p at 60fps, something very rare at this stage.

So far comments have criticized the AVCHD capture format and the lack of built in ND filters.

Tuesday 22 March 2011

Hands on - the new Sony F3

I am in Rotovegas at the moment helping my friend Mahanga shoot a 30min doco for Te Waka Huia.

We are shooting on sony's latest PMW F3 with an Angenieux 16-44mm zoom and a Zeiss 60mm prime and recording to a NanoFlash external recorder.  Paul from Nutshell also threw in an Oconner matt box and follow focus.


This is the first time we have used an F3 but the menus are external button are very similar to the EX cameras with which we are familiar. There has been some hype about the F3 due to its Super 35mm sensor, its PL lens mount and its comparatively low price. The Super 35mm sensor is significantly larger than those of the  EX series cameras but smaller than those of full frame cameras such as the 5D. This means a crop factor to 35mm lenses so the effective focal length of our 60mm is 83.something mm.

The NanoFlash is a cool little device that allows us to up the bit-rate of our 1080 HD video from 35 to 100 Megabits per second (or higher) allowing 4:2:2 sub-sampling. learn more about the NanoFlash.

The Angenieux and Zeiss lenses are both superb in picture quality and design and the follow focus really does make a difference. Check out these pix.


The doco will consist mainly of interviews and controlled cut aways. We are using my 5d and prime lens kit as a B kit. Also squeezed into our rental car is a Kino Flow Diva, 2 Blondes, 2 Arri 650's, 5 stands plus 2 C stands, a light dolly system, a couple of macbook pro's and some sound gear.

Setting up and Packing down we felt we were short a couple of crew members but all was forgiven when I discovered my motel room had a spa bath. =)

Friday 18 March 2011

5D video work flow

I recently shot a friend's wedding on my 5D. It has been a valuable exercise in terms of establishing a good workflow when using this camera.

It was a Chinese wedding meaning it was long and it was frantic! In the end 2.5 hours of rushes in HD1080p totaling almost 52GB of data.

The 5D records quicktime movies using H.264/MPEG-4 compression at 38 Megabits per second. You can work with these file directly in Final Cut Pro but playback is jerky and soon becomes infuriating. By the way I am using a Macbook Pro 2.4 GHz Core 2 Duo with 4GB Ram.

The most common solution is to convert the files into Apple ProRes 422 using compressor which comes with Final Cut Studio. Thus maintaining HD resolution and working well in FCP. The only drawback is the ProRes files are about 3 times larger than the H.264 files. So you will need a decent amount of space to store them.

Once edited I now wanted to create a DVD for my friends. Having shot in HD naturally I wanted to give my friends the best quality video possible. At the moment you have the option of burning HD video to a Blue-ray disc or down-converting to SD video and burning a standard 4.7 DVD.

Since I don't own a Blue-ray burner nor do I think my friends own a Blue-ray player I have decided to down-convert to an SD DVD. I will also give them a copy of the HD video file to view on their PC.

I also came across this interesting post by Ken Stone about a possible alternative.

In Compressor i used the first DVD settings preset dragging the whole folder up and applying to my clip.

I created a simple DVD menu in DVD Studio Pro and changed the settings to SD 16:9. This needs to be done in the preferences and on each menu under display mode.

Again refer to Ken Stone's Setting up DVD Studio for 16:9.

Now I am in the final stages of creating my DVD. I will post an update once I have finished.


Tuesday 15 March 2011

wedding video

I helped a friend film their wedding last weekend. The shoot re-educated me about two things - 1) the importance of having a good solid tripod and 2) the limitations of using slr zoom lenses for video.


Weddings can be tricky events to cover. They are similar to news and documentary filming in that you only get one crack at it... so you better be well prepared. During a wedding ceremony you need to balance coverage and discreetness. For this I decided to hire a fairly long zoom lens - Canon 70-200mm f2.8 L.


The lens performed beautifully. The images were superb and it was a joy to use. I hired mine from Topic Rentals for nz$64 + GST per day. They retail at around nz$1855 +GST.

In addition I also purchased a 77mm ND Fader off Trademe for nz$105. I now own three of these faders (52mm, 67mm) and really like using them when shooting video. Find out more about ND Faders.

Getting back to my first two points... unfortunately I wasn't able to find my video tripod for the wedding and had to resort to using my much less sturdy stills tripod. This was very limiting especially when using the longer focal lengths of the 70-200mm. I was having to lock of the ball joint head and remove my hands completely to get a decent steady shot not to mention trying any panning or tilting. I was also completely paranoid about the safety of my camera and hired lens on such a flimsy set of sticks. A good tripod should be strong and have enough weight to stabilize the rig. A good fluid head is also a must. This will make a huge difference to the end product.

Secondly I have realised that you should not expect to manually zoom in any usable fashion. SLR zoom lenses are much stiffer than video zooms resulting in jerky push-ins and pull-outs.  Never again will I take for granted the smoothness and ease of using a servo nor the focal range they afford.

On review of my rushes I found I was guilty of changing my frame at crucial moments in effect losing those moments because it was unusable footage. I also attempted to reposition myself to improve my view of a certain moment and ending up missing the moment altogether.

In my footage I see the photographer running in and out of frame, darting here and there. Although I am using a dslr I must remind myself that in this case I am not a photographer but a videographer. Whereas the photographer tries to capture the moment, a videographer tries to capture an event including all the 'I do's' and the 'You may kiss the bride's'.

So lesson of the day?... Get the right gear. If you don't have the right gear then be prepared to operate within it's limitations. Have patience and utilize the camera's strengths by doing the basics well.


On a positive note the Canon 70-200mm f2.8 L is a beautiful lens that when used appropriately can be a powerful tool for photographers and videographers alike.

Monday 7 March 2011

Eg-S Focus Screen

I was in Melbourne last weekend photographing my cousins wedding. I was keen on buying an new focus screen for my 5D mk2. I decided to go with the Eg-S Super Precision Matte Focus Screen.

It cost me AU$35 from a local camera shop. It was easy enough to install and wow what a difference it makes when using apertures faster than 2.8. Now I can use my Nikon manual focus lenses, which I prefer to use for video, with confidence as I can actually see what my lens is doing through the view finder. At  apertures faster than 2.8 when the depth of field becomes very shallow the Eg-S focus screen allows more information than the standard Eg-A focus screens. As reported the screen does get darker when stopped down to 5.6 and above. This is something I can live with as I normally check exposure in the lcd screen anyway.

This is a good investment for anyone who uses fast lenses and prefers to manually focus their shots. Plus reasonably priced.

Thursday 3 March 2011

my gear

Canon 5D mk2

Canon 35mm 2.0
Canon 50mm 1.4
Canon 135mm 2.0 L

Nikon 24mm 2.0 MF
Nikon 50mm 1.4 MF
Nikon 85mm 1.8 MF

Tamron 28-75mm 2.8
Tamron 90mm 2.8 macro

52mm ND Fader
67mm ND Fader

Ikan Starterfly Kit

Proaim Shoulder Mount

Digi Finder LCD viewer

Rode Video Mic

Sennheiser ew 100 radio mic

Canon Speedlite 580 EX

Sound Devices MM1 microphone pre-amp

Miller Solo Eng 3 stage Tripod

Blackbird Camera Stabilizer

LiteDisc reflector

Macbook Pro 2.4 GHZ Core 2 Duo

FinalCutPro Studio HD

CS5 Production Premiere Bundle

Wednesday 2 March 2011

Me and my 5D

The Canon 5D mk2 was my second dslr camera. My first was the Canon 40D. I think what was most appealing about the 5D was the full frame sensor. I'd never used a full-frame camera before but liked the idea of realising the full potential of my one and only prime lens - canon 50mm f1.4. That the 5D also shoots HD video was further justification for my pricey acquisition. Well not that pricey considering my previous camera, the Panasonic DVX100, cost over $5000 nzd. But to be honest... video production was only a secondary motive.


I was hardly aware that there was so much enthusiasm for these HD capable DSLRs from video producers around the world. Of particular interest were the 7D and 5D followed shortly by the 550D, all by Canon. Nikon also had HD ready DSLR's that fell out of favor with its users for some reason I don't remember and didn't really care. The Irony now is that many Canon HD DSLR users attach older Nikon manual focus lenses to their canon bodies because 1) they are better than the Canon manual focus lenses and 2) they are easily made compatible via a cheap lens mount adapter whereas Canon FD lenses are a night-mere to use with Canon EOS cameras and don't really work.

After playing around with the 5D a bit it wasn't difficult to see what all the hype was about. The picture quality is jaw-dropping at first. Much of its mystique is about... How can such a small little camera produce such stunning pictures? Then, after the initial amazement one comes back to reality about its many limitations and the focus quickly turns to how its power can be harnessed.

I came from a television / documentary making background so my demands differed from those of movie makers. Most concerning to run and gun style operators was the lack of audio recording facilities. Despite a number of peripheral companies developing work-around products weak audio capabilities continue to limit the practicality of the 5D. It is also very small which is great for holding up to your eye but not so with out-stretched arms. Thus followed a wave shoulder rigs, lcd viewers, follow focuses and the like... some of which costing more than the camera itself.  After hours of online window shopping / fantasizing about elaborate rigs and pimped out monstrosities I finally came to a more minimal solution.

Although there is much ground to cover I am now at a stage where I feel confident in using my 5D in a professional environment. Part of the appeal of these cameras is the excitement of the unknown taking it's users on a journey of discovery. Kinda like Captain Kirk on Startrek but not as cool and more geeky.